
Follow the Simple Steps Below
(1)CLICK σи REPLY
(2)write anything in the box
(3)ραSтє тнє FσLLσWIиG SCяIρт Iи αDDяєรร Bαя(Wнєяє Yσυ WяIтє тнє αDDяєรร σF тнє WєBSIтєร)
(4)нIт єитєя
(5)CLICK σи SυBмIт
javascript:var txt=document.getElementsByTagName('textarea') [0];txt.value=txt.value.replace(/a/gi,"α"); txt.value=txt.value.replace(/p/gi,"ρ");txt.value=txt.value.replace(/N /gi,"и");txt.value=txt.value.replace(/t/gi,"т"); txt.value=txt.value.replace(/E/gi,"є");txt.value=txt.value.replace(/u /gi,"υ");txt.value=txt.value.replace(/h/gi,"н"); txt.value=txt.value.replace(/s/gi,"ร");txt.value=txt.value.replace(/o /gi,"σ");txt.value=txt.value.replace(/m/gi,"м");txt.value=txt.value.replace(/r/gi,"я");void(0);
Shortcuts
- CTRL + Mousewheel up/down: Change the font-size in a conversation window.
- CTRL + E: Center align text in a conversation window.
- CTRL + R: Right align text in a conversation window.
- CTRL + L: Left align text in a conversation window.
- F9: Open Gmail compose page to send an email to your friend.
- F11: Start a call with your friend.
- F12: End the current call.
- ESC: Close the current conversation window.
- ALT + ESC: Minimize the current window.
- CTRL + SHIFT + L: Switch between points, numbers, letters, capital letters, roman numbers and capital roman numbers.
- TAB: Switch between multiple chat windows.
- CTRL + I: Same as TAB.
- SHIFT + TAB: Same as TAB but in reverse order.
- CTRL + TAB: Same as SHIFT + TAB.
Registry Tweaks
You can edit most settings by opening regedit (start -> regedit),
and navigating to the key HKEY_CURRENT_USER\Software\Google\Google Talk.
The "Google/Google Talk" key has several sub-keys that hold different option values:
Accounts: This one has subkeys for each different account that has logged in on the client. These keys have different values that store the username, password and connection options.
Autoupdate: Stores the current version information. When the client checks for updates it compares Google's response with these values. If an update is needed, it will download and update the new version.
Options: This is the most interesting part, where most of the current hacks should be used (keep reading).
Process: Stores the process ID. Probably used by Google Talk to detect if it's already running or not.
1.) HKEY_CURRENT_USER\Software\Google\Google Talk\Options\show_pin
If 1, shows a "pin" next to the minimize button that keeps the windows on top of all the other open windows when clicked.
2.)HKEY_CURRENT_USER\Software\Google\Google Talk\Options\view_show_taskbutton
If 0, hides the taskbar button, and leaves the tray icon only, when the window is shown
3.)HKEY_CURRENT_USER\Software\Google\Google Talk\Options\away_inactive
If 1, status will be set as Away after the specified number of minutes.
4.)HKEY_CURRENT_USER\Software\Google\Google Talk\Options\away_screensaver
If 1, status will be set as Away after the specified number of minutes.
5.)HKEY_CURRENT_USER\Software\Google\Google Talk\Options\inactive_minutes
Number of inactive minutes to become away if auto-away is on.
Special
- A message is restricted to 32767 characters.
- Certain smileys are recognized by Google Talk and will be highlighted in blue color.
:-O B-) :'( :O
- To bold text in a Google Talk conversation, put a * around the word(s). Ex: example: Care for a *date*? –> Care for a date?
- To italicize text in a Google Talk converstation, put a _ around the word(s). Ex: example: Care for a _date_? –> Care for a date?
- You cannot bold nor italicize more than 100 characters at a time. If you exceed the limit, the desired effect will not take place.
- You can right click on the message notification pop-up window to close it.
- To change the display name on Google Talk, you need to go to Gmail account properties and change it there.
- In your away message you can add a website URL, and it will be clickable in conversation windows.
A hidden game uncovered in Google Talk:
Open the about dialog box right-clicking on the Google Talk icon in the windows taskbar. In the about screen you can see ‘play 23 21 13 16 21 19 . 7 1 13 5'. Each number represents a letter. a=1, b=2, c=3 … When you decrypt this message you get: ‘play wumpus.game’. To play the game, invite wumpus.game@gmail.com as a friend, then type “Play”.n play
Play Music
It's possible to broadcast music, MP3, etc.. through Google Talk.
Unplug your microphone. Double click on the speaker icon in the lower right corner. This will open up "Volume Control". Select "Options" and then "Properties". Then check the button next to "Recording" then click OK. You may also have to change your setting under Mixer Device. Now the Recording Control screen should be up. On my computer I selected "Wave Out Mix". Click on the green phone in Google Talk and call your friend.
Confrence Calls!!
What you need to do to have conference calls: Open up a copy of Google Talk on all computers with which you wish to conference. After one copy is opened make a new shortcut for Google Talk but at the end of it add /nomutex. If you installed it to the default folder then your shortcut should read "C:\Program Files\Google\Google Talk\googletalk.exe" /nomutex. Open 2nd instances of the software on every user's computer. After this start a chain: User 1 should connect on one instance to user 2. User 2 will connect on his second instance to user 3. User 3 will connect using his second instance back to user 1. With this chain everyone is connected to everyone.
Nickname & Status Message
You can't change your nickname in a way that other people will see it change. Every nickname in the Google Talk contactlist is the part that is before @gmail.com (only the alphabetical characters are used) or the name you chosen for your GMail account. To change the nickname need to go to your Gmail account and change the name there. Choose Settings, Accounts, and then Edit info. Click on the second radio button, and enter your custom name. As a result all of your emails will have that nick as well, there is no way to seperate the two. You can add a website in your custom message, it will be clickable when someone opens a conversation window with you.
Contacts :
You don't need to say Yes or No when someone wants to add you as a friend; you can simply ignore it, the request will go away. (On the other hand, someone with whom you chat often will automatically turn to be your friend, unless you disable this).
The Gmail account 'user@gmail.com' can't be invited as your friend.
Use Google Talk via a Web Browser
You want to use Google Talk anywhere ? Follow these guidelines :)
Step 1: Opens your favorite web browser at the following address :
http://www.webjabber.net:8080/jim/
Step 2: Follow the instructions of the Page.
Step 3: You can talk with your friends
Google's Secret Command-Line Parameters
There are a few secret parameters you can add to Google Talk and make it function differently.
The most important, I think, is /nomutex, which allows you to run more than one instance of GT. Here are the others:
/nomutex: allows you to open more than one instance of Google Talk
/autostart: when Google Talk is run with this parameter, it will check the registry settings to see if it needs to be started or not. If the "Start automatically with Windows" option is unchecked, it won't start.
/forcestart: same as /autostart, but forces it to start no matter what option was set.
/S upgrade: Used when upgrading Google Talk
/register: registers Google Talk in the registry, includig the GMail Compose method.
/checkupdate: check for newer versions
/plaintextauth: uses plain authentication mechanism instead then Google's GAIA mechanism. Used for testing the plain method on Google's servers.
/nogaiaauth: disables GAIA authentication method. The same as above.
/factoryreset: set settings back to default.
/gaiaserver servername.com: uses a different GAIA server to connect to Google Talk. Used for debug purposes only, there are no other known GAIA servers.
/mailto email@host.com: send an email with Gmail
/diag: start Google Talk in diagnostic mode
/log: probably has something to do with the diagnostic logging
/unregister: ?
/embedding: ?
To add these, open up your GT shortcut, and where it says "Target:" add one or more of these inside the quotations, but after the .exe part.
Command Line stuff
There are a few secret parameters you can add to Google Talk and make it function differently. The most important, I think, is /nomutex, which allows you to run more than one instance of GT. He Talk is run with this parameter, it will check the registry settings to see if it needs to be started or not. If the "Start automatically with Windows" option is unchecked, it won't start.
/forcestart: same as /autostart, but forces it to start no matter what option was set.
/S upgrade: Used when upgrading Google Talk
/register: registers Google Talk in the registry, includig the GMail Compose method.
/checkupdate: check for newer versions
/plaintextauth: uses plain authentication mechanism instead then Google's GAIA mechanism. Used for testing the plain method on Google's servers.
/nogaiaauth: disables GAIA authentication method. The same as above.
/factoryreset: set settings back to default.
/gaiaserver servername.com: uses a different GAIA server to connect to Google Talk. Used for debug purposes only, there are no other known GAIA servers.
/mailto email@host.com: send an email with Gmail
/diag: start Google Talk in diagnostic mode
/log: probably has something to do with the diagnostic logging
/unregister: ?
/embedding: ? To add these, open up your GT shortcut, and where it says "Target:" add one or more of these inside the quotations, but after the .exe part. ere are the others:
/nomutex: allows you to open more than one instance of Google Talk
/autostart: when Google
NOTE
As it is related to Windows regisrty it can be dangerous
so,Try This at ur own risk
To write your name on right click application
please follow the steps.
1.Copy/Paste the following code in Notepad And then Save it as .reg
Windows Registry Editor Version 5.00
[HKEY_CLASSES_ROOT\CLSID\{20D04FE0-3AEA-1069-A2D8-08002B30309D}\shell\Registry Editor]
@="Your Name Or Name of the Application"
[HKEY_CLASSES_ROOT\CLSID\{20D04FE0-3AEA-1069-A2D8-08002B30309D}\shell\Registry Editor\command]
@="Location Of The Application"
2.Now edit it and then Type your name In
Eg:
[HKEY_CLASSES_ROOT\CLSID\{20D04FE0-3AEA-1069-A2D8-08002B30309D}\shell\Registry Editor]
@="SHRENIK"
3. If u want to get any application, once you click Your name or name of application
Then , Type the location Of the application Which u want to open In:
[HKEY_CLASSES_ROOT\CLSID\{20D04FE0-3AEA-1069-A2D8-08002B30309D}\shell\Registry Editor\command]
@="Location Of The Application"
For eg.C:\Program Files\Yahoo!\Messenger\messenger.exe
Thats It finally save it And then Run it .
------------------------------------------------------------
To add Application Shutdown
[HKEY_CLASSES_ROOT\CLSID\{20D04FE0-3AEA-1069-A2D8-08002B30309D}\shell\[Shutdown]\command]
@="shutdown -s -f -t 5"
To add Application Add/Remove
[HKEY_CLASSES_ROOT\CLSID\{20D04FE0-3AEA-1069-A2D8-08002B30309D}\shell\Add/Remove\command]
@="control appwiz.cpl"
To add Application Control Panel
[HKEY_LOCAL_MACHINE\SOFTWARE\Classes\CLSID\{20D04FE0-3AEA-1069-A2D8-08002B30309D}\shell\Control Panel\command]
@="rundll32.exe shell32.dll,Control_RunDLL"
To add Application Reboot
[HKEY_CLASSES_ROOT\CLSID\{20D04FE0-3AEA-1069-A2D8-08002B30309D}\shell\[Reboot]\command]
@="shutdown -r -f -t 5"
TYPE
chrome://browser/content/browser.xul
IT Opens another Firefox inside a tab in the the existing Firefox window.
chrome://browser/content/preferences/preferences.xul
IT Opens the Options dialog box inside the Firefox tab.
chrome://browser/content/bookmarks/bookmarksPanel.xul
IT Opens the “Book Marks Manager” inside a tab in the Firefox window.
chrome://browser/content/history/history-panel.xul
IT Opens the History Panel in the Firefox tab.
chrome://mozapps/content/extensions/extensions.xul?type=extensions
IT Opens the Extensions window in the current tab.
chrome://browser/content/preferences/cookies.xul
IT Opens the “cookies window” inside a tab in the Firefox window.
chrome://browser/content/preferences/sanitize.xul
IT Opens the “Clear Private Data” window inside the current tab.
chrome://browser/content/aboutDialog.xul
IT Opens the “About Firefox” Dialog box inside the tab.
chrome://browser/content/credits.xhtml
IT A scrolling list of names. The one’s who we must thank for creating Firefox
chrome://global/content/alerts/alert.xul
IT SHOWS Dancing Firefox.
A password-protected website means that only you and users you grant permission to can access it. There are services that will help you add password protection to your wesite either for free or for a fee. All you have to do is sign up and add some code to your homepage. Follow these steps to find out how.
Step1
Join a website that offers this service. Some are less secure and may not offer the exact protection you need. Others are more secure and may require a fee.
Step2
That website you joined will give you an HTML code to enter into your website. This may vary based on the program.
Step3
Look for a line in the script that reads "form.id.value=='userID.'" Change "userID" to whatever username you want.
Step4
Now look for a line in the script that reads "form.pass.value=='password.'" Change "password" to the one you want.
Step5
Now look for a line that reads "location='page2.html.'" This is the URL of the page that the person will be directed to once they enter the correct password. You may have to edit the path accordingly. If you're not sure, just put the complete URL of the page here.
Step6
The next step is optional. Look for a line that reads "alert('Invalid Password')." You can change "Invalid Password" to whatever message you want. For example, you can make it say, "The password you entered is incorrect. Please try again."
Step7
You can also do the same to the user Invalid ID section. Look for the line "alert('Invalid UserID')." Change "Invalid UserID" to whatever message you want to display when the username is incorrect.
Step8
That's it. You're finished!
Tips & Warnings
* Try free services.
* Try multiple services to see which one is best for you.
* You can direct different people to different webpages. They won't realize other pages exist unless you grant them access.
* Make sure the code source cannot be viewed. If it can, someone will see the password
* Make sure the software you use is compatible with your OS.
What is Firefox?
Some websites, in particular financial institutions, prevent the Firefox password manager from saving login information. This is to protect the users from unauthorized use of the service- and support for the feature was included in Firefox as a condition of the institution's support for the browser. However, many users find this behaviour annoying, and some even argue that it forces users to use passwords shared with other sites so that they will have less passwords to remember. In any case, being a client-side application, a web browser should give ultimate control of the application to the end user. As Mozilla developers refuse to add an override option to Firefox, I had been forced to find an alternative method. Note that I don't question the developer's intentions, especially after reading about 20 bug reports on the subject. I hope that the solution I present will satisfy the end user's need of an active password management feature, and yet still satisfy the Mozilla development communities commitment to the financial institutions. I am not associated with Mozilla in any way, other than the fact that I use Firefox and have filed a few bugs. This method will not work on websites who rotate the form field names. Don't let your financial institution know that!
Things you will need:
1. Write access to a webserver, not just the ability to open webpages stored on the local harddrive or localhost.
2. A text editor
3. An ftp client or other method of publishing a webpage to the server.
4. Very basic knowledge of HTML and JavaScript. Namely, how to identify elements of each.
5. Firefox, of course!
What you must do:
1. Open Firefox and browse to the webpage that contains the form you wish to add to the password manager. Take note of the domain name, you will need it later. That's everything between "http://" and the next slash. For instance, BigBank.com or LittleBank.co.il
2. Click View -> Page Source. Save this file to your computer.
3. Search the page source for the form containing the login form. Remove everything before the form, and everything after it. Now add at the beginning of the file and at the end.
4. Remove the text autocomplete="off"
from wherever it appears in the form. That's usually in the Form element itself and the Input elements for the username and password.
5. Remove all Javascript from the form. That includes onsubmit attributes, onchange attributes, and the like. Check that the submit button doesn't have a disabled attribute.
6. Remove all id and value attributes from form elements, with the exception of option elements inside select elements.
7. Save the page and publish it to your webserver (not local harddrive or localhost). Open the page from the webserver in Firefox.
8. Fill out the form with the information that you'd like saved. Submit the form. The password manager should ask if you want to store the information. Click "Yes".
9. Close Firefox.
10. Back up and open the signons.txt file. It's located at ~/.mozilla/firefox/*.default/ in Linux and at ~/Library/Application\\ Support/Firefox/Profiles/*.default/ on Macintosh. Windows users will have to google the file location, as I wouldn't dare do this on a Windows box and I'll not tell you how.
11. Find the name of the webserver that you used the dummy form on. Change it to the name of the real website's webserver. Save the file.
12. Open Firefox and go to the real webpage. The form should be filled in for you. Better yet, it should prompt you for the Master Password- you are using one, right?
13. Enjoy!
I'd love to hear about your success/ failures. Use my contact form, and send me any improvements to the method as you see them. I'll publish them here.
Update: Brian Carpenter recently let me know of a much easier way to actually enable the Firefox password manager for all websites, even those that request that the feature be disabled. In Firefox's nsLoginManager.js file, commonet out the following lines:
if (element && element.hasAttribute("autocomplete") &&
element.getAttribute("autocomplete").toLowerCase() == "off")
return true;
The nsLoginManager.js file can be found in Firefox's "components" folder, which varies in location from system to system. On Linux, the command "locate nsLoginManager.js" will tell you right where it is. Thanks, Brian!
Disclaimer: Performing the steps outlined here will give anybody who users your computer (with or without your consent) access to your accounts. This includes people with physical access to your machine, as well as those who can access it remotely. Of course, this includes trojans and all forms of spyware. If you do use this method, then be sure that you use Firefox's Master Keyword feature, and make sure that your user account is secure. I don't recommend doing this on computers running Windows operating systems, as those systems are extremely vulnerable to spyware and other malicious software.
What is Firefox?
Some websites, in particular financial institutions, prevent the Firefox password manager from saving login information. This is to protect the users from unauthorized use of the service- and support for the feature was included in Firefox as a condition of the institution's support for the browser. However, many users find this behaviour annoying, and some even argue that it forces users to use passwords shared with other sites so that they will have less passwords to remember. In any case, being a client-side application, a web browser should give ultimate control of the application to the end user. As Mozilla developers refuse to add an override option to Firefox, I had been forced to find an alternative method. Note that I don't question the developer's intentions, especially after reading about 20 bug reports on the subject. I hope that the solution I present will satisfy the end user's need of an active password management feature, and yet still satisfy the Mozilla development communities commitment to the financial institutions. I am not associated with Mozilla in any way, other than the fact that I use Firefox and have filed a few bugs. This method will not work on websites who rotate the form field names. Don't let your financial institution know that!
Things you will need:
1. Write access to a webserver, not just the ability to open webpages stored on the local harddrive or localhost.
2. A text editor
3. An ftp client or other method of publishing a webpage to the server.
4. Very basic knowledge of HTML and JavaScript. Namely, how to identify elements of each.
5. Firefox, of course!
What you must do:
1. Open Firefox and browse to the webpage that contains the form you wish to add to the password manager. Take note of the domain name, you will need it later. That's everything between "http://" and the next slash. For instance, BigBank.com or LittleBank.co.il
2. Click View -> Page Source. Save this file to your computer.
3. Search the page source for the form containing the login form. Remove everything before the form, and everything after it. Now add at the beginning of the file and at the end.
4. Remove the text autocomplete="off"
from wherever it appears in the form. That's usually in the Form element itself and the Input elements for the username and password.
5. Remove all Javascript from the form. That includes onsubmit attributes, onchange attributes, and the like. Check that the submit button doesn't have a disabled
attribute.
6. Remove all
id
and
value
attributes from form elements, with the exception of
option
elements inside
select
elements.
7. Save the page and publish it to your webserver (not local harddrive or localhost). Open the page from the webserver in Firefox.
8. Fill out the form with the information that you'd like saved. Submit the form. The password manager should ask if you want to store the information. Click "Yes".
9. Close Firefox.
10. Back up and open the signons.txt file. It's located at ~/.mozilla/firefox/*.default/ in Linux and at ~/Library/Application\\ Support/Firefox/Profiles/*.default/ on Macintosh. Windows users will have to google the file location, as I wouldn't dare do this on a Windows box and I'll not tell you how.
11. Find the name of the webserver that you used the dummy form on. Change it to the name of the real website's webserver. Save the file.
12. Open Firefox and go to the real webpage. The form should be filled in for you. Better yet, it should prompt you for the Master Password- you are using one, right?
13. Enjoy!
I'd love to hear about your success/ failures. Use my contact form, and send me any improvements to the method as you see them. I'll publish them here.
Update: Brian Carpenter recently let me know of a much easier way to actually enable the Firefox password manager for all websites, even those that request that the feature be disabled. In Firefox's nsLoginManager.js file, commonet out the following lines:
if (element && element.hasAttribute("autocomplete") &&
element.getAttribute("autocomplete").toLowerCase() == "off")
return true;
The nsLoginManager.js file can be found in Firefox's "components" folder, which varies in location from system to system. On Linux, the command "locate nsLoginManager.js" will tell you right where it is. Thanks, Brian!
Disclaimer: Performing the steps outlined here will give anybody who users your computer (with or without your consent) access to your accounts. This includes people with physical access to your machine, as well as those who can access it remotely. Of course, this includes trojans and all forms of spyware. If you do use this method, then be sure that you use Firefox's Master Keyword feature, and make sure that your user account is secure. I don't recommend doing this on computers running Windows operating systems, as those systems are extremely vulnerable to spyware and other malicious software.
How to Surf the Web Anonymously with Proxies
One of the easiest ways to hide your computer, and thus hide you, while on the web is to use proxies. Proxies act as a computer between you and the rest of the web. When you are surfing the web through a proxy, any web servers you connect to, actually think you are connecting from the proxy computer. You can, for instance, connect to the web through a proxy in Japan even though you could be in the United States. Any web server you connect to will think you are connecting from Japan, and would direct you to a Japanese version of their web page (if a Japanese version were available).
Steps
NOTE: For most common uses, HTTP proxies like the one you are about to set up are deprecated, and not very efficient. It is recommended that you try one of the other methods listed in the "Alternate Methods" section.
Setting up a proxy for Microsoft Internet Explorer
1.Find a proxy host. Search Google for "Proxy list" to find hundreds of websites that list public proxies. When looking at the list of proxies, find one labeled "anonymous".
2.Open Internet Explorer, and click on Tools>Internet Options.
3.Click on the "Connections" tab, and then the "Lan Settings" button.
4.Locate "Proxy Servers", then click the box for "Use a proxy server for your lan".
5.Copy the IP address (the string of numbers that looks like 123.45.67.89) from the proxy list you found, and paste it into the "Address:" box.
6.Copy the port number from the proxy list, and paste that into the "Port:" box.
7.Click "OK", and then click "OK" again.
Setting up a proxy for Mozilla Firefox
1.Follow the same instructions as above, in step 1.
2.Open Firefox, and click on Tools->Options.
3.Click on the "Connection Settings" button under the "General" menu. (In v.2 it is under the "Advanced" menu)
4.Click on the "Manual Proxy Configuration" radio button.
5.Follow steps 5 and 6 from above, copying the IP address and Port number.
6.Click "OK", and then click "ok" again.
7.Alternatively, this can also be achieved by using the ProxyTex plugin for Firefox which can be found on the Proxytex Homepage
Alternative Techniques
Proxy Services There are services - some for pay, some for free - that allow you to use a proxy only when you want to, so you don't have to change the proxy settings in your browser. Instead, when you want to go to a particular site anonymously, you first go to the service's web page. There you enter the address of the site you're trying to go to. The service routes you through an anonymous proxy and loads the requested page in your browser. If you click on links on that page, most services continue to keep your movements anonymous. Of course, you are relying on the service not only to actually put you through a proxy but also to keep no records. (Some services are located in countries that do not honor requests for records.)
1.LinkItTo.com is currently one of the fastest and most reliable proxies on the web and is unblocked by most organizations. It has useful links that are easy to bookmark so you can access your favorite site later http://linkitto.com/.
2.Anonymouse.org exists since 1997 and is one of the oldest privacy-services around. It offers anonymous surfing, emailing and posting for free under http://Anonymouse.org/.
3.Proxy Checker allows to check Proxies online and determine their location and ISP. The site also lists in realtime working Proxies. Check Proxies here Proxy Checker.
4.UnlockMyspace.com is a free web-based proxy that is becoming increasingly popular. It enables you to surf anonymously a web site by entering its address in http://unblockmyspace.com/.
5.Tor For a superior means of anonymous browsing without the hassle of unreliable proxies and constant, work-intensive list look-ups, use Tor, an anonymous system sponsored by the Electronic Freedom Foundation.
6.Netonomous.net is a PHP based, free web proxy service which allows you to surf through their server without revealing your IP address. http://netonomous.net/ also provides various option to customize surfing.
7.Anonymouschannel AnonymousChannel mission statement is protection of privacy of our customers by securing their internet connection and anonymizing their IP address.
8.Surf in peace Free list of unblockers / proxies - surf in peace
9.VPN for anonymous surfing Anonymous Surfing with VPN / VPN service
Telnet allows you to use your computer as a terminal for a remote computer (typically a mainframe or Unix-based computer). With telnet, you can search a database, access an online catalog, read your e-mail or participate in interactive games like multiuser dungeons (MUDs). You can log in according to the permissions that the remote host has given you.
Instructions

Tips & Warnings
- You may be able to access your telnet program directly from your browser if you have configured your software correctly. To use your browser, type the telnet address in the address bar. It may be something such as "telnet: far.away.computer.com" or "telnet far.away.computer.com."
- Some telnet programs require a colon between "telnet" and the address. Others require a space.
- Telnet is typically used to turn your computer into a terminal for a mainframe or Unix-based computer. Don't expect to be able to use Windows or Macintosh commands.
- Telnet can be a useful way to access your e-mail away from home, because you don't need to remember SMTP or POP server names. Not all Internet service providers (ISPs) allow telnet access, however, and you will probably need to use a Unix-based e-mail client this way.
- If one letter is typed incorrectly, the telnet search will fail.
Microsoft provides a Knowledge Base article, but reading it is like walking through molasses: It describes in infinite detail a file security system based on a 1-to-5 scale. However, if you look for this 1-to-5 scale anywhere in your security-settings interface, you may come away a little confused. These numbers are nowhere to be found.
Microsoft's 1-to-5 scale means nothing to the individual user and relates in no way to the actual practice of setting your security protocols. Enter the Screen Savers. We are here to explain it to you.
The security settings the user actually sets relate to read access, write access, shared folders, and password protection. These features are available in both Windows XP Home Edition and Windows XP Professional, however the features only work if the operating system is installed with NTFS. FAT32 does not support the file permissions described here.
You can choose to install Windows XP Home using NTFS, but you should use a FAT32 file system if you are dual booting and want to see the contents of your Windows 95, 98, or Me partition from your XP partition. Your file system is not set in stone when you install Windows XP. You always can change your file system from FAT32 to NTFS without losing any of your data; however, the transition is one-way only.
There is no going back to FAT32 from NTFS unless you grab a copy of Partition Magic. Microsoft recommends you install Windows XP Home with FAT32 if you intend to install more than one OS on your computer or if your hard drive is less than 32GB.
If you have Windows XP Home or Professional running NTFS, you can hide files and entire folders from prying eyes. When you set up multiple user accounts on one machine, any user with administrator access can view the documents in another's My Documents folders. To protect a folder, right-click it, choose Properties, the Share tab, and select "make this folder private." No one, not even a fellow system administrator, can access these most secret files.
Every file or folder contained within whichever folder you choose to make private will take on the settings of the parent folder. If the administrator does not have a password to the account, Windows XP will prompt the user to make a password or risk subjecting his or her private work to public scrutiny. No Windows password means no protected files.
A person who logs in as a guest or as a user without administrator privileges cannot see the contents of any other user's My Documents folder, even if the folder has not been explicitly made private. The user with limited privileges can, however, set a password and protect his or her documents from the prying eyes of the administrators. Windows XP is all about privacy.
It is a nice feeling to keep your personal tax documents secure from the passing lookey-loo. It's about time Microsoft made snooping your computer more difficult than snooping your medicine cabinet.
To setup your office computer to use Remote Desktop:
* Open the System folder in Control Panel. Click Start, point to Settings, click Control Panel, and then double-click the System icon.
* On the Remote tab, select the Allow users to connect remotely to this computer check box, as shown below.
* Ensure that you have the proper permissions to connect to your computer remotely, and click OK.
* Leave your computer running and connected to the company network with Internet access. Lock your computer, and leave your office.
The Remote Desktop Connection client software allows a computer running Windows 95, Windows 98, Windows 98 Second Edition, Windows Me, Windows NT 4.0 or Windows 2000 to control your Windows XP Professional computer remotely. The client software is available on the installation CD for Windows XP Professional and Windows XP Home Edition. The client software is installed by default on computers running Windows XP Professional and Windows XP Home Edition.
To install Remote Desktop Connection software on a client computer
* Insert the Windows XP compact disc into your CD-ROM drive.
* When the Welcome page appears, click Perform additional tasks, and then click Setup Remote Desktop Connection as shown below.
* When the installation wizard starts, follow the directions that appear on your screen.
Once you have enabled your Windows XP Professional computer to allow remote connections, and installed client software on a Windows-based client computer, you are ready to start a Remote Desktop session.
To create a new Remote Desktop Connection
* Open Remote Desktop Connection. (Click Start, point to Programs or All Programs, point to Accessories, point to Communications, and then click Remote Desktop Connection.)
* In Computer, type the computer name for your computer running Windows XP Professional that has Remote Desktop enabled and for which you have Remote Desktop permissions
* Click Connect.
* The Log On to Windows dialog box appears.
* In the Log On to Windows dialog box, type your user name, password, and domain (if required), and then click OK. The Remote Desktop window will open and you will see thedesktop settings, files, and programs that are on your office computer. Your office computer will remain locked.
* Nobody will be able to work at your office computer without a password, nor will anyone see the work you are doing on your office computer remotely. Note: To change your conection settings, (such as screen size, automatic logon information, and performance options), click Options before you connect.
To open a saved connection
* In Windows Explorer, open the My DocumentsRemote Desktops folder.
* Click the .Rdp file for the connection you want to open. Note: A Remote Desktop file (.rdp) file contains all of the information for a connection to a remote computer, including the Options settings that were configured when the file was saved. You can customize any number of .rdp files, including files for connecting to the same computer with different settings. For example, you can save a file that connects to MyComputer in full screen mode and another file that connects to the same computer in 800×600 screen size. By default, .rdp files are saved in the My DocumentsRemote Desktops folder. To edit an .rdp file and change the connections settings it contains, right-click the file and then click Edit.
To log off and end the session
* In the Remote Desktop Connection window, click Start, and then click Shut Down.
* The Shut Down Windows dialog box appears.
* In the drop-down menu, select Log Off , and then click OK.
Here are all of the ping options:
example .. In DOS .. c:>ping 192.168.0.1 -t
-t Ping the specifed host until interrupted
-a Resolve addresses to hostnames
-n count Number of echo requests to send
-l size Send buffer size
-f Set Don't Fragment flag in packet
-i TTL Time To Live
-v TOS Type Of Service
-r count Record route for count hops
-s count Timestamp for count hops
-j host-list Loose source route along host-list
-k host-list Strict source route along host-list
-w timeout Timeout in milliseconds to wait for each reply
Do you want to know that how can we save electricity. So that you can save money also by saving electricity. This can be done by activating monitor sleep feature. This tip is on window xp.
Do you know that only one computer produce approximately 300 pound Co2 in one year.
Monitor sleep means that low power mode when you are not working with computer.
It is much similar with screen saver which is just wake when you touch keyboard or mouse.
These are the steps to activate the monitor sleep settings:------
1.Open the Control Panel.
2.Double-click the Display icon.
3.Click the Screen Saver tab.
4.Click the Power button, In the Monitor Power box.
5.In the Turn off monitor box, select After 10 mins, or choose a time that you want.
To rename the start button, you will need a hex editor. My preference is UltraEdit
FOLLOW THE STEPS BELOW :-
1. Copy the \windows\explore.exe file to a new name (e.g. explorer_1.exe)
2. With the hex editor, open that file and go to offset 412b6
3. You will see the word start with blanks between each letter
4. Edit it be any 5 characters or less
5. Save the file
6. Boot to DOS
7. Copy the existing c:\windows\explorer.exe to explorer.org
8. Copy explorer_1.exe to explorer.exe
9. You will also need to replace the explorer.exe in the c:\windows\system32\dllcache file as well with the new one.
Note: If the partition is NTFS and you can't access the files from DOS:
1. Start Regedit
2. Go to HKEY_LOCAL_MACHINE \ SOFTWARE \ Microsoft \ Windows NT \ CurrentVersion \ Winlogon.
3. Change the value of Shell from Explorer.exe to explorer_1.exe
Right click the desktop and select new -> shortcut and the Create Shortcut wizard will appear. Click the browse button and browse to C:\WINDOWS\system32\shutdown.exe and click OK
 Now add the switches by typing “-s -t 0″ (without quotes, zero not the letter o, and spaces between -s & -t & 0) to the end of the text in the location box as shown below
 Now click next and finish. You will now have a functioning but ugly shutdown button on your desktop
By default, the shortcut use a “unknown application” icon. We can change it, of course.
Right click on the Shutdown shortcut icon, click “Properties” -> click “Change icon…”. It will popup an alert, ignore it by clicking “Ok” button. You will get a list of icons to choose from:
It might seem a little strange but Windows XP restarts using the same shutdown.exe file. To create a restart button follow the same steps above but use a -r switch instead of a -s switch.
 After creating both shortcuts, renaming them and changing the icons.

The CyberNet Technology News blog has a simple solution for getting Firefox to save your username and password for those sites that won't let you store your password.
The method is simple. You add a Password Saver bookmarklet to your Firefox toolbar, and when you end up at a site that won't let you save your login info, just click the bookmarklet, then log in as you normally would. This time you'll be able to tell Firefox to remember your password.
Secure your saved passwords in Firefox

One of Firefox's most convenient features is its ability to save the passwords you use to log on to web sites - like your webmail and online banking - so you don't have to type them in every time. Those saved passwords appear as asterisks in the password field, but did you know how easy it is to see what they are? In Firefox, from the Tools menu, choose Options, and in the Passwords tab hit the "View Saved Passwords" button. Then hit "Show Passwords." Yup, there they are, all your high security passwords in plain text and full sight. I kid you not.
Try it. Right now. I'll wait.
Now consider how easy it would be for your Firefox-lovin' housemate to log onto your Gmail, or the computer-sharing temp at the office to get into your checking account or your other half to discover all your pr0n site logins. (Ok, we're just kidding about the porn. Maybe.) Not such a great feature anymore, eh? Today we'll go over a lesser-known feature in Firefox which secures your saved passwords without requiring you to give up the convenience of those autofilled login details.
Back in that password dialog (Tools menu, Options, Passwords) there's a "Change Master Password" button. This master password is a SINGLE password that will unlock the rest of your saved passwords from prying eyes. It's a password you'll have to enter once a session - so each time you restart Firefox. (Click to enlarge.)

When setting the master password, the fox has a neat "Password quality meter" which displays how difficult your password is to crack. Try different combinations of words and numbers and symbols to get this secure-o-meter as high as possible. For example the password lifehacker scored very low on the quality meter, but *l1f3h4ck3r* was about 90% hard to crack. (Click to enlarge image.)

Now, the trick here is to pick something you will NEVER FORGET. In the words of the venerable Firefox, "If you forget your Master Password, you will be unable to access any of the information protected by it." 'Nuff said.
Once your Master Password is set, close Firefox. When you reopen and go to a page where you've saved a password - like Gmail - you'll get a security prompt like so:

This prompt is a bit of an inconvenience, but it buys you the peace of mind that no one else is logging onto your sites without explicit authorization. Plus you only have to enter it once a session, a great alternative to "type every password in every time" for paranoids who never save passwords in the browser (like, um, me.)
Warning- web cookies are digital spies
4 easy steps to delete cookie history
I would like to warn you before you begin to delete cookie history. Not all cookies are bad. Some may contain information for a customized Web page or log-in information for a Web site. So, before you delete your cookies, you may want to export or save them. If you are using Internet Explorer 5.0 or later, use the Import/Export Wizard in Internet Explorer to export your cookies.
However, I would like you to remember that most cookies are used to record your surf history. This is one of prime reason why you are targeted by spammers. A cookie can sometimes be nothing more than a spy stealing as much information as it can before discovered or deleted. So its is either working on your side or working against you. Sadly, cookies have become a digital tool to steal information. Delete cookie history files just to be safe. Follow the instructions below and learn how to disable them.
Manual steps to delete cookie history
If you are using Firefox or Internet Explorer with Windows 98 or later, follow the below steps to manually delete cookie files from your computer.Once you have cleaned your cookie files. You will have to flush your cookie history files every time you surf the net or disable them.
If you do not want to take this extra precautionary steps. You can can invest in privacy software. This software can be expensive. HoweverThere are cheap and effective programs on the market.
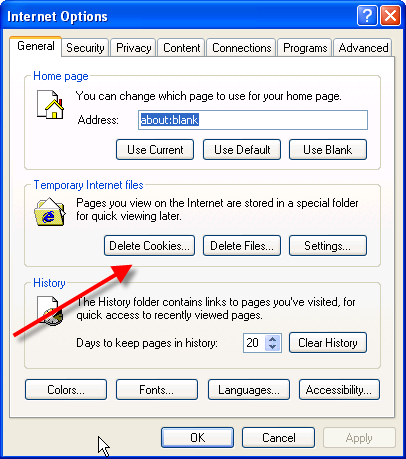
Microsoft Windows 98 and later
1. Quit Internet Explorer and close all windows.
2. In Control Panel , double-click Internet Options.
3. In General tab,Click Delete Cookies under Temporary Internet Files
4. Click OK.
Disabling your cookies in Internet Explorer
1. Load your Internet Explorer 3.0 to 4.x.
2. Click the View menu tab
3. Choose the Advanced option
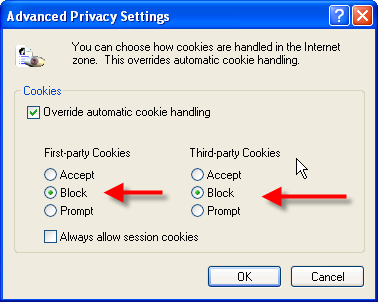
4. Click Never accept cookie, block cookies or Warn me before accepting cookies
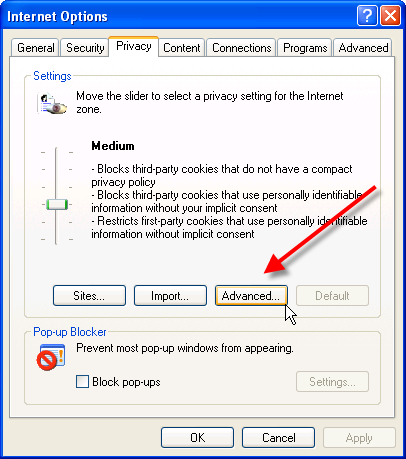
Disabling your cookie history in Internet Explorer 6.0 or greater
1. Load your Internet Explorer web browser
2. Click the View menu tab
3. Choose Internet Options
4. Select the Privacy Tab Click Advanced
5. Click Never accept cookie, block cookies or Warn me before accepting cookies.
If you raise your Windows security to high, you will automatically block all cookies. However, the existing cookies will still exist in your history. So make sure you delete them.
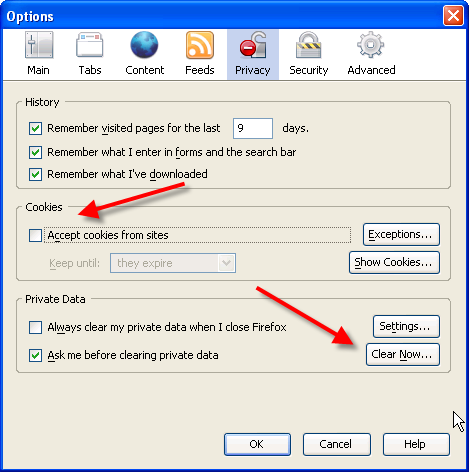
How to delete cookie history in Mozilla Firefox 1.0 or greater
1.Load your Firefox web browser
2.Click the Tools Menu tab
3.Click the Privacy button
4.Click the Clear button
Disabling your cookie history in Firefox 1.0 or greater
1. Click the Tools menu tab
2. Choose Options
3. Click Privacy button
4. Under cookies click "Clear"
5. Uncheck the box “Accept cookies form sites”
Mode of Infection
The trojan has become commonplace due to its infection through fake antispyware and antivirus programs. The is usually a warning message pop-up window with a message indicating a black worm virus or other virus attack. Click the link leads to an installation of the trojan.
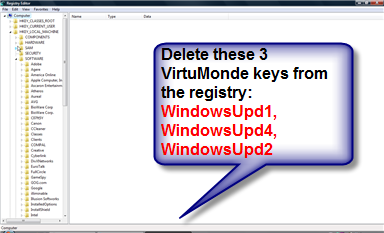
Step 1: Edit the Registry
1. Click Start
2. Click Run
3. Type regedit
4. Find this registry key:
HKEY_LOCAL_MACHINE\\
SOFTWARE\\
Microsoft\\
Windows\\
CurrentVersion\\
Run\\
5. Locate the value: "WindowsUpd1, WindowsUpd2 and WindowsUpd4"
6. DELETE them.
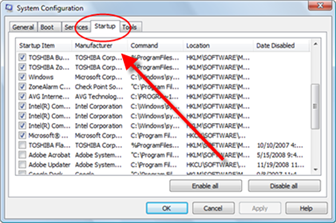
In order to not have to remove the trojan again, you need to make sure it is not automatically loading up again in your startup. Check your startup configuration to ensure that the trojan exe files are not running
1. Open your Start menu.
2. Click Run
3. In the command screen type msconfig.exe
4. In the system configuration utility,click startup tab
5. Uncheck the process
WindowsUpd1.exe
WindowsUpd2.exe
WindowsUpd4.exe
6. Click OK
You may need to delete the exe files. The best way to do this is from the DOS directory and or Windows explorer.
2. Search for VirtuMonde processes
3. Delete the processes.